
If you have ever looked at an infrared photograph and wondered why the trees look like they are covered in snow, or why the grass glows bright white, you are seeing the “Wood Effect.”
It is the single most defining characteristic of infrared photography. Without it, most IR landscapes would look flat and uninteresting. But despite the name, it has nothing to do with timber, bark, or the material “wood.”
Here is the reason behind the name and the science behind the phenomenon, and also how you can use it to create more striking images.
It’s Named After a Person, Not a Tree
The first misconception to clear up is the name. The effect is named after Robert W. Wood, an American physicist and inventor who is widely considered the ‘father’ of infrared photography.
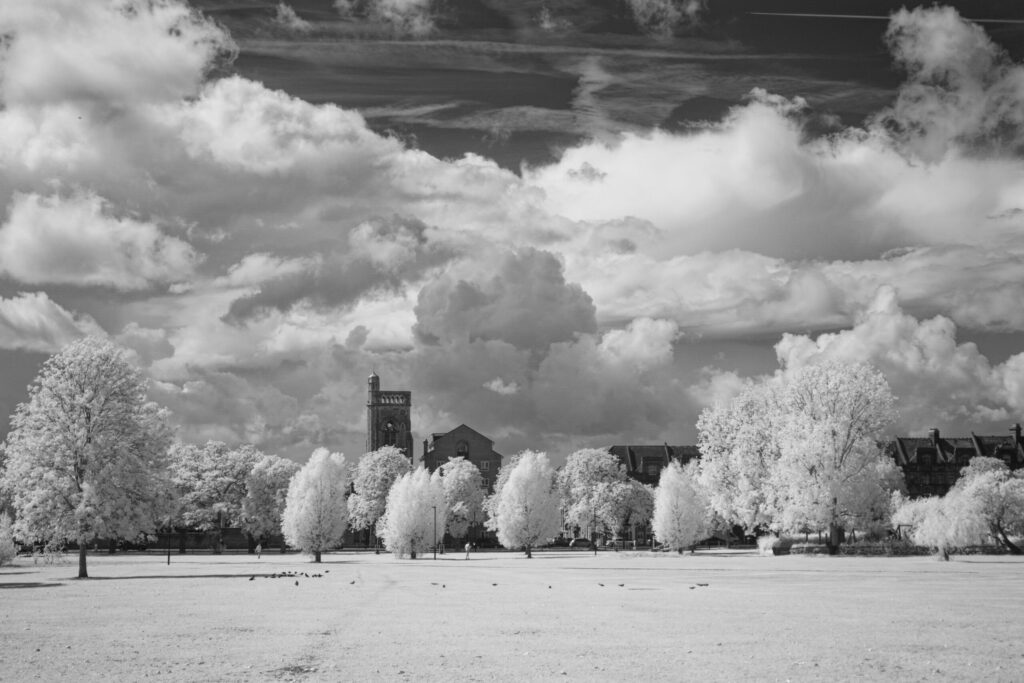
In 1910, Wood published the first photographs taken on experimental plates sensitive to infrared light. He noted that in these images, the blue sky appeared nearly black, and green foliage appeared as bright as snow. This unique rendering of vegetation became known as the Wood Effect.
The Science: Chlorophyll and Survival
Why do plants glow in infrared? It comes down to biology and survival.
We see plants as green because they contain chlorophyll, which absorbs red and blue light for photosynthesis but reflects green light. However, if plants absorbed all the light from the sun – including the high-energy infrared spectrum – they would rapidly overheat and die.
To prevent this, the cellular structure of healthy leaves is transparent to infrared light. The IR radiation passes through the outer layer of the leaf, bounces around inside the cell structure (specifically the spongy mesophyll), and is reflected back out strongly.
The deeper science behind IR radiation and leaf cell structure:
Transparency vs. Absorption: The upper layers of a leaf (the cuticle and epidermis) are largely transparent to Near-Infrared (NIR) light. They don’t reflect much of it; they let it pass right through.
The “Mirror Maze”: Once the IR light gets past the outer layer, it hits the spongy mesophyll layer. This layer is full of air gaps and water-filled cells. Every time light moves from water to air (or cell wall to air), the refractive index changes, causing the light to refract and scatter.
Internal Scattering (The Key): The IR light bounces around wildly inside this structure. Because the plant lacks any pigment that absorbs IR wavelengths (chlorophyll ignores them), the light eventually scatters back out of the leaf in all directions.
Why no heat? Because the light is scattered and reflected out rather than absorbed by the tissue, the energy is ejected. This is the plant’s natural cooling mechanism. If the leaf absorbed that high-energy NIR radiation, it would cook the enzymes required for photosynthesis.
The “Snow” Analogy Think of a pile of snow. Ice crystals are clear (transparent), but a pile of snow looks bright white. Why? Because light penetrates the pile, bounces off millions of ice/air surfaces inside, and scatters back out.
When you use an infrared-converted camera, your sensor records this massive reflection of light. Because the reflection is so intense, it renders as pure white or very light tones in your final image.
When Does the Wood Effect Work Best?
Not all plants are created equal. Since the effect relies on active, healthy chlorophyll, the results will vary depending on the subject and the season.
- Deciduous Trees: Broad-leafed trees usually produce the strongest Wood Effect. They have a large surface area and complex cell structures that reflect massive amounts of IR light.
- Conifers: Pine trees and evergreens often appear darker (grey rather than white) because their needles have a different structure and absorb more IR.
- Dead Vegetation: A dead leaf has no active chlorophyll and has dried out. In an infrared photo, a dead tree or dried grass will look dark and drab, appearing almost the same as it does in visible light.
- Artificial Plants: Plastic plants and AstroTurf usually absorb IR light, making them look oddly dark in photos. This is a great way to spot “fake” nature in a landscape!
Practical Tips for Capturing the Effect
To maximize the Wood Effect in your photography, you need to think about light differently than you do for standard color photography.
1. Shoot in Hard Sunlight
In visible light photography, we often avoid the midday sun because it creates harsh shadows. In infrared, midday is often the best time to shoot. The sun produces the most infrared radiation when it is high in the sky, causing the foliage to reflect more intensely. This creates the highest contrast between the glowing white leaves and the dark, light-absorbing sky.
2. Check Your Season
Infrared is a seasonal discipline. The effect is most dramatic in Spring and early Summer when leaves are fresh, healthy, and full of moisture. As Autumn approaches and leaves begin to die (even before they change color to our eyes), their IR reflectivity drops, and the “glow” begins to fade.
3. Compositional Contrast
The Wood Effect looks best when it is contrasted against something that absorbs infrared light.
- Water: usually turns black or very dark.
- Sky: clear blue skies turn dark (almost black with a 720nm filter).
- Architecture: stone and brick usually render in mid-grey tones.
By framing a bright white tree against a black sky or dark water, you create the surreal, high-contrast look that defines the medium.
Summary
The Wood Effect is a reminder that infrared photography is about capturing the properties of a subject, not just its surface appearance. You aren’t photographing a tree; you are photographing the way a living organism interacts with the electromagnetic spectrum.